Morpheus unassigned disk report

I am working now quite a while for MorpheusData and it is time for my first blog post on Morpheus.

We introduced a very cool feature in Morpheus version 5.5.2: An unassigned disk report!

This really cool feature is a little bit hidden in the UI and therefore I want to show you, how to access the report and what is needed that the report shows up.

First things first: To see the report and the Morpheus Guidance in general, you need to enable Guidance in your Cloud settings:

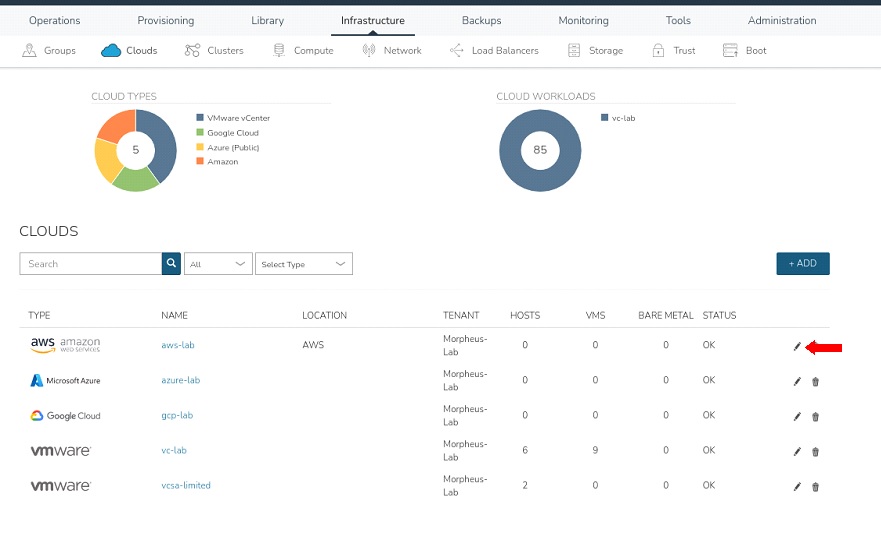
To double check if guidance is turned on on the Cloud, click on “Edit” next to your Cloud.

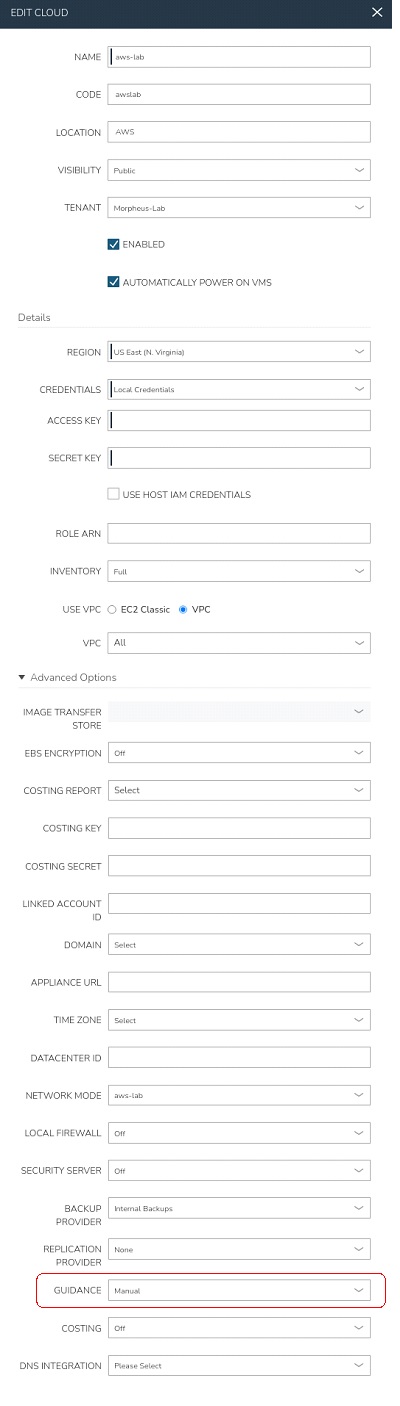
And check under Advanced if Guidance is set to manual.

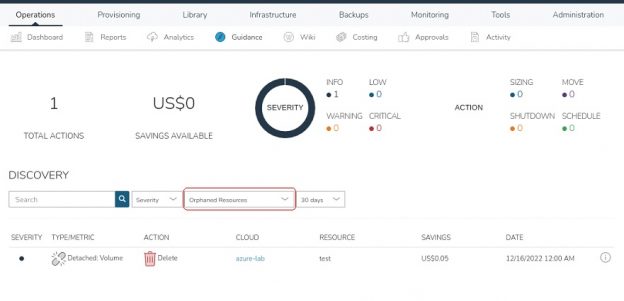
To view the Report, click on Operations->Guidance and select “Oprhaned Ressources” as Type.

It might take up a little bit till the disk shows up, because the Guidance report is created around midnight UTC. In case you do not see the disk showing up, please be patient.

Clicking in the the “i” of the reported disc, you can directly delete the disk.

WARNING: You do not see, if the disc was created by Morpheus or you created the disc otherwise.

PLEASE BE CAREFUL DELETING AN UNASSIGNED DISC REPORTED BY MORPHEUS!

How to add a SSL certificate to the Cloud Director certificate repository

I was quite often asked, if I could describe how to add a certificate into Cloud Director so that can be used as described in my blog post on How to use custom SSL certificates.

Here we go:

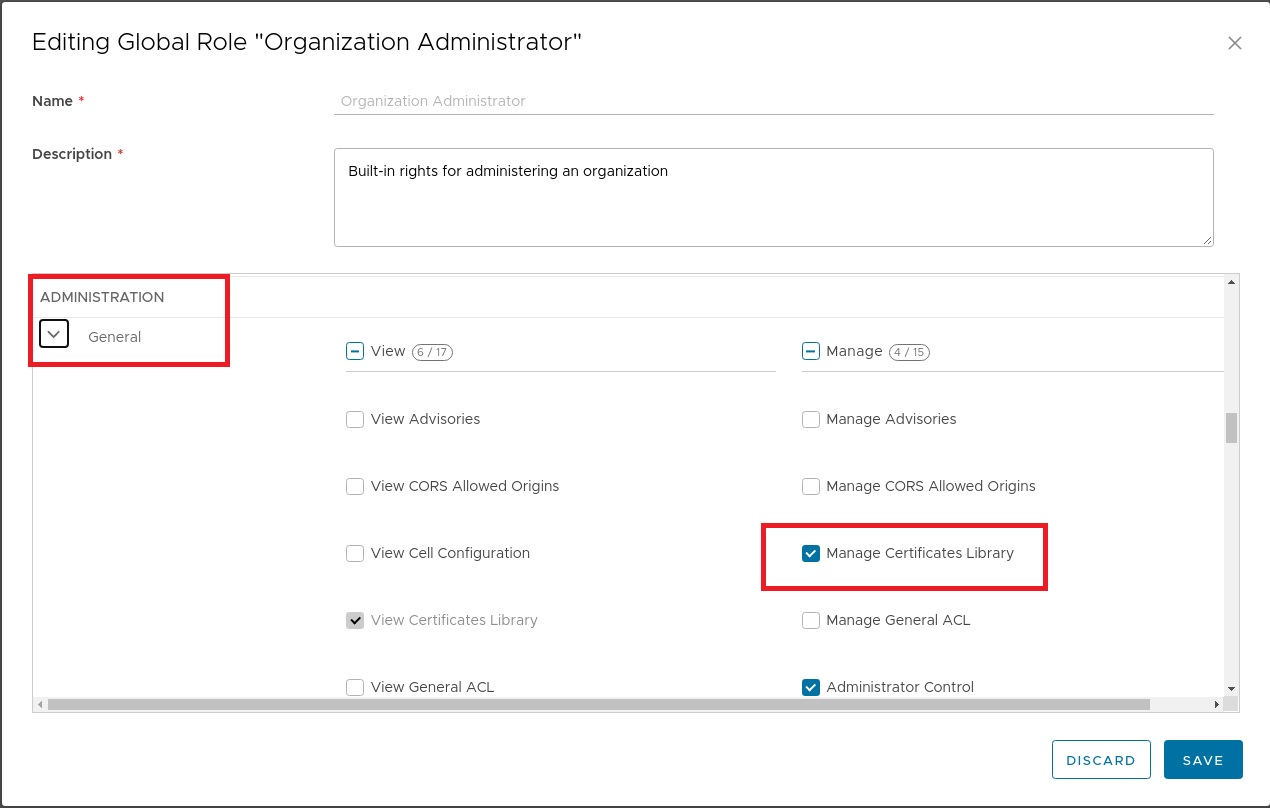
First of all, you have give you tenant the permission to manage their own certificates:

Edit the GlobalRole OrgAdmin or any other rule you want to grant CertificateLibrary permissions under “Administration->TenantAccesControl->GlobalRoles->OrganisationAdministrator->Edit”


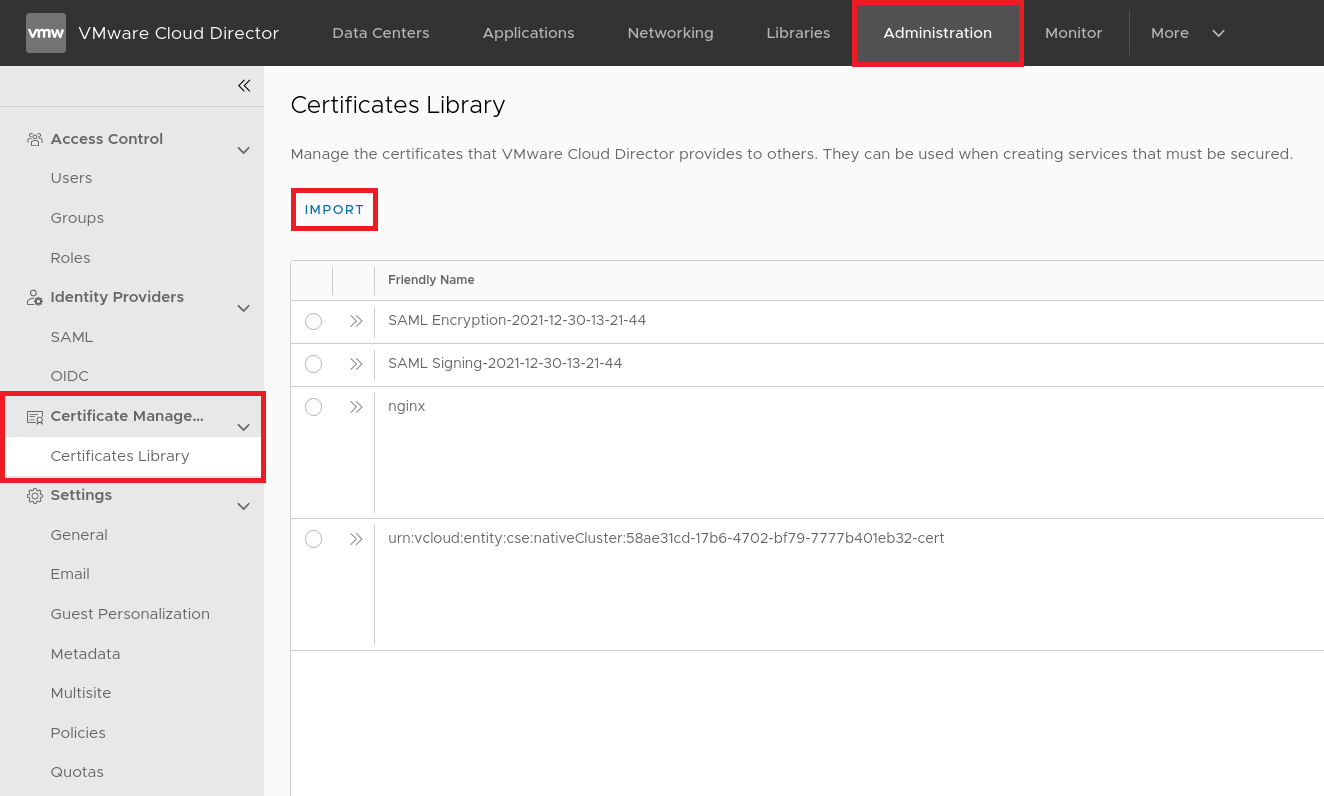
Afterwards you can log in as Org user that has the rights assigned accordingly and add the certificate to your CertLibrary:

Go to Administration->CertificateManagement->Certificates Library->Import.

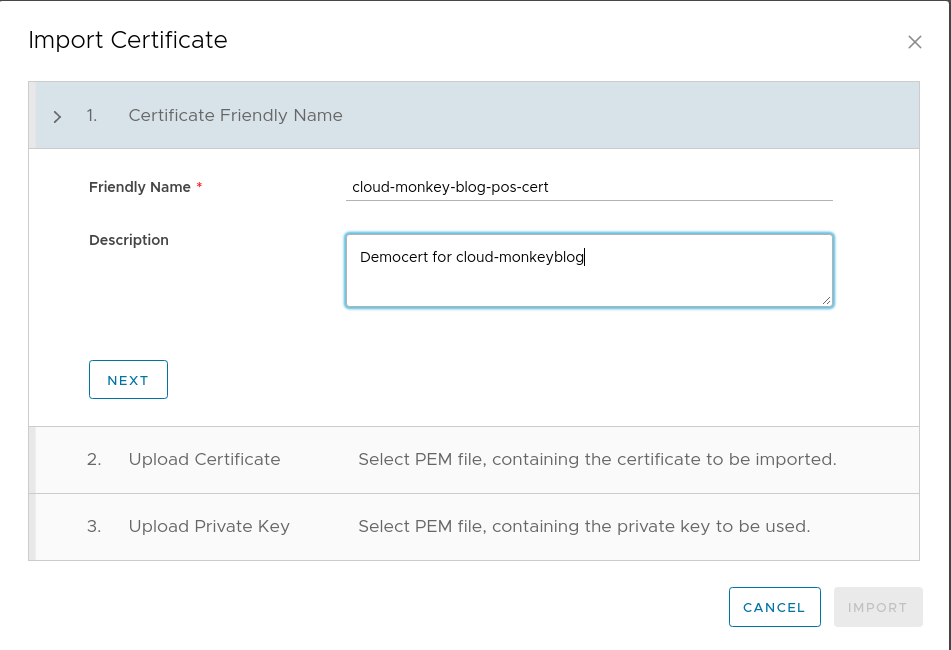
Afterwards give a name for the cert:

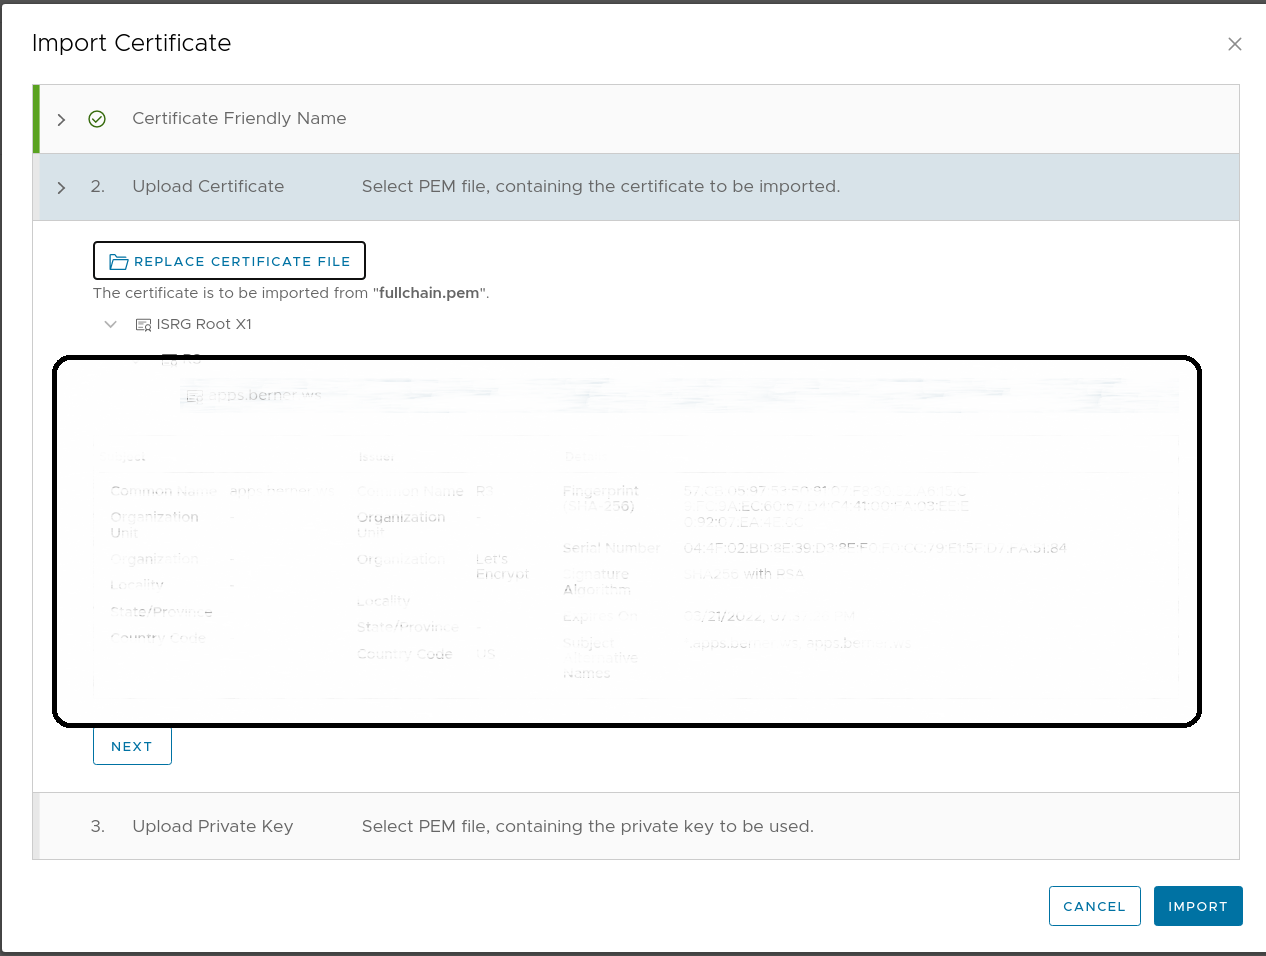
Import the full-chain of the certificate:

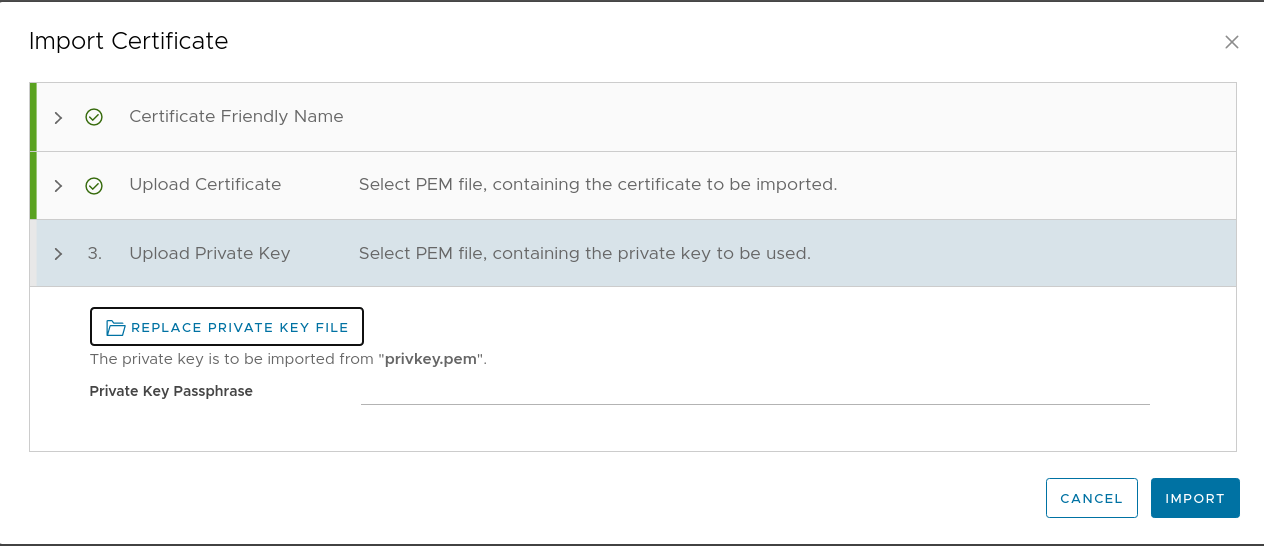
and the private key:

Now the certificate is ready to use! You can refer to the cert using the name you have given.

How to use a per Service SSL certificate in a CSE TKGm cluster

Using VMware Cloud Director and the Container Service extension you can use kubectl expose to create a service of type Load Balancer.

The Kubernetes clusters, created by the Container Service extension, can leverage the NSX Advanced Load Balancer (formerly know as AVI Load Balancer). The integration, that is done via the Cloud Controller Manager, support L4 load balancing. With the latest version of CCM, you are now be able to define a certificate per service created.

Requirements

To follow the following steps, I assume that CSE 3.1.2 is deployed (CSE Installation) , NSX Advanced deployed and configured to be used by CSE (Enable NSX Advanced Load Balancer in VCD).

First of all, you have to check if CCM version 1.1.0 is deployed.

kubectl get deployment vmware-cloud-director-ccm -n kube-system

apiVersion: apps/v1
kind: Deployment
metadata:
  annotations:
    deployment.kubernetes.io/revision: "1"
    kubectl.kubernetes.io/last-applied-configuration: |
      {"apiVersion":"apps/v1","kind":"Deployment","metadata":{"annotations":{},"labels":{"app":"vmware-cloud-director-ccm"},"name":"vmware-cloud-director-ccm","namespace":"kube-system"},"spec":{"replicas":1,"revisionHistoryLimit":2,"selector":{"matchLabels":{"app":"vmware-cloud-director-ccm"}},"template":{"metadata":{"annotations":{"scheduler.alpha.kubernetes.io/critical-pod":""},"labels":{"app":"vmware-cloud-director-ccm"}},"spec":{"affinity":{"nodeAffinity":{"requiredDuringSchedulingIgnoredDuringExecution":{"nodeSelectorTerms":[{"matchExpressions":[{"key":"node-role.kubernetes.io/master","operator":"Exists"}]}]}}},"containers":[{"command":["/opt/vcloud/bin/cloud-provider-for-cloud-director","--cloud-provider=vmware-cloud-director","--cloud-config=/etc/kubernetes/vcloud/vcloud-ccm-config.yaml","--allow-untagged-cloud=true"],"image":"projects.registry.vmware.com/vmware-cloud-director/cloud-provider-for-cloud-director:1.1.0.latest","imagePullPolicy":"IfNotPresent","name":"vmware-cloud-director-ccm","volumeMounts":[{"mountPath":"/etc/kubernetes/vcloud","name":"vcloud-ccm-config-volume"},{"mountPath":"/etc/kubernetes/vcloud/basic-auth","name":"vcloud-ccm-vcloud-basic-auth-volume"}]}],"dnsPolicy":"Default","hostNetwork":true,"serviceAccountName":"cloud-controller-manager","tolerations":[{"effect":"NoSchedule","key":"node.cloudprovider.kubernetes.io/uninitialized","value":"true"},{"key":"CriticalAddonsOnly","operator":"Exists"},{"effect":"NoSchedule","key":"node-role.kubernetes.io/master"}],"volumes":[{"configMap":{"name":"vcloud-ccm-configmap"},"name":"vcloud-ccm-config-volume"},{"name":"vcloud-ccm-vcloud-basic-auth-volume","secret":{"secretName":"vcloud-basic-auth"}}]}}}}
  creationTimestamp: "2022-01-31T17:00:35Z"
  generation: 1
  labels:
    app: vmware-cloud-director-ccm
  name: vmware-cloud-director-ccm
  namespace: kube-system
  resourceVersion: "826"
  uid: 9c0ec466-03f1-41c4-81f2-ee14075c7286
spec:
  progressDeadlineSeconds: 600
  replicas: 1
  revisionHistoryLimit: 2
  selector:
    matchLabels:
      app: vmware-cloud-director-ccm
  strategy:
    rollingUpdate:
      maxSurge: 25%
      maxUnavailable: 25%
    type: RollingUpdate
  template:
    metadata:
      annotations:
        scheduler.alpha.kubernetes.io/critical-pod: ""
      creationTimestamp: null
      labels:
        app: vmware-cloud-director-ccm
    spec:
      affinity:
        nodeAffinity:
          requiredDuringSchedulingIgnoredDuringExecution:
            nodeSelectorTerms:
            - matchExpressions:
              - key: node-role.kubernetes.io/master
                operator: Exists
      containers:
      - command:
        - /opt/vcloud/bin/cloud-provider-for-cloud-director
        - --cloud-provider=vmware-cloud-director
        - --cloud-config=/etc/kubernetes/vcloud/vcloud-ccm-config.yaml
        - --allow-untagged-cloud=true
        image: projects.registry.vmware.com/vmware-cloud-director/cloud-provider-for-cloud-director:1.1.0.latest
        imagePullPolicy: IfNotPresent
        name: vmware-cloud-director-ccm
        resources: {}
        terminationMessagePath: /dev/termination-log
        terminationMessagePolicy: File
        volumeMounts:
        - mountPath: /etc/kubernetes/vcloud
          name: vcloud-ccm-config-volume
        - mountPath: /etc/kubernetes/vcloud/basic-auth
          name: vcloud-ccm-vcloud-basic-auth-volume
      dnsPolicy: Default
      hostNetwork: true
      restartPolicy: Always
      schedulerName: default-scheduler
      securityContext: {}
      serviceAccount: cloud-controller-manager
      serviceAccountName: cloud-controller-manager
      terminationGracePeriodSeconds: 30
      tolerations:
      - effect: NoSchedule
        key: node.cloudprovider.kubernetes.io/uninitialized
        value: "true"
      - key: CriticalAddonsOnly
        operator: Exists
      - effect: NoSchedule
        key: node-role.kubernetes.io/master
      volumes:
      - configMap:
          defaultMode: 420
          name: vcloud-ccm-configmap
        name: vcloud-ccm-config-volume
      - name: vcloud-ccm-vcloud-basic-auth-volume
        secret:
          defaultMode: 420
          secretName: vcloud-basic-auth
status:
  availableReplicas: 1
  conditions:
  - lastTransitionTime: "2022-01-31T17:02:50Z"
    lastUpdateTime: "2022-01-31T17:02:50Z"
    message: Deployment has minimum availability.
    reason: MinimumReplicasAvailable
    status: "True"
    type: Available
  - lastTransitionTime: "2022-01-31T17:00:35Z"
    lastUpdateTime: "2022-01-31T17:02:50Z"
    message: ReplicaSet "vmware-cloud-director-ccm-b5d58cd57" has successfully progressed.
    reason: NewReplicaSetAvailable
    status: "True"
    type: Progressing
  observedGeneration: 1
  readyReplicas: 1
  replicas: 1
  updatedReplicas: 1

Search for:

 projects.registry.vmware.com/vmware-cloud-director/cloud-provider-for-cloud-director:1.1.0.latest

Version 1.1.0.latest is needed for the following steps.

A little bit of background on SSL load Balancers

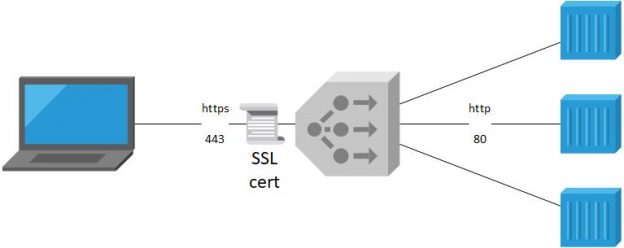
When creating a Load Balancer of encrypted traffic, you have to decide where your encryption endpoint should be hosted. 

We differentiate between two possible architecture:

  • SSL Termination on the Load Balancer
  • SSL Passthrough

Here you can find more details on the different SSL Load Balancer Architectures. 

In our use-case, exposing SSL workloads, running on a TKGm cluster created by CSE, SSL termination is the supported architecture.  

We need to create a NSX Advanced Load Balancer with an SSL certificate for the endpoint. The traffic will be forwarded from the Load Balancer as http traffic to the containers.

How to configure a service using SSL termination and a custom SSL-certificate

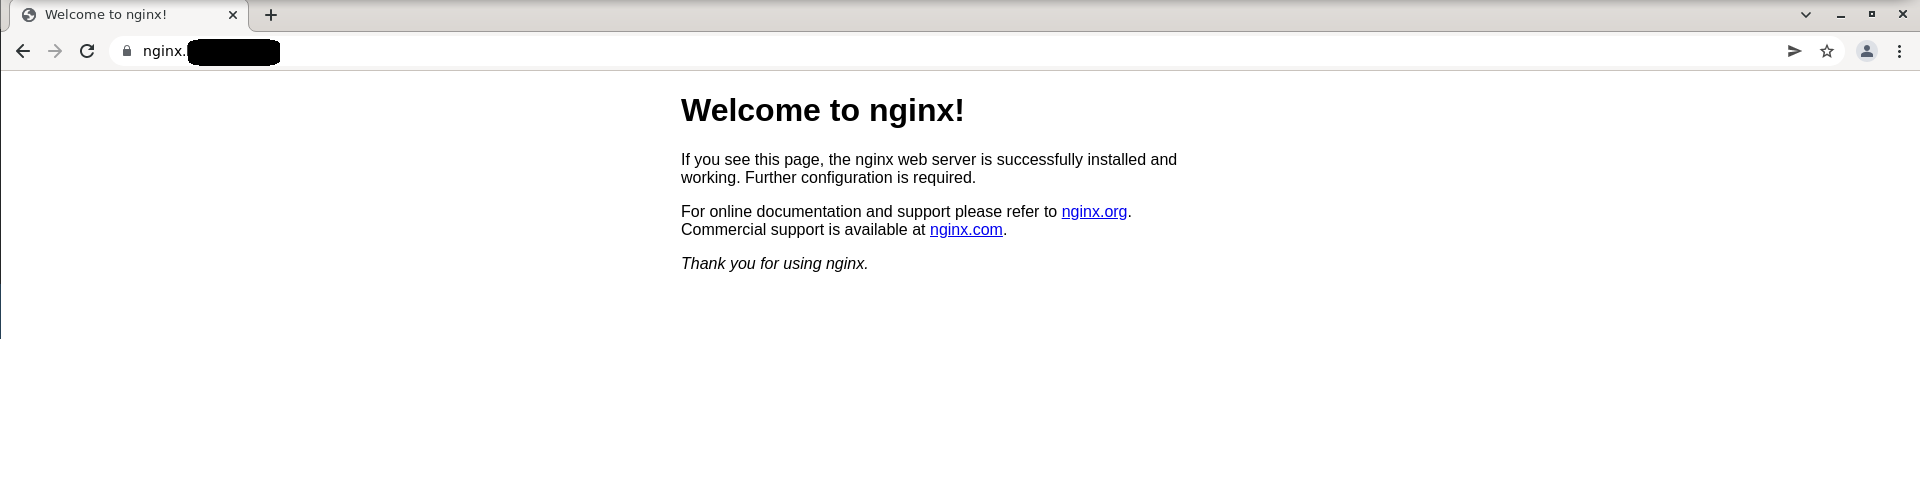
I will show in the following, how to expose a NGINX deployment using https.

First of all, you have to create a deployment:

 kubectl create deployment nginx --image=nginx --replicas=2

To expose a service using SSL termination you need to add the following annotation to your service definition:

annotations:
  service.beta.kubernetes.io/vcloud-avi-ssl-ports: "443"
  service.beta.kubernetes.io/vcloud-avi-ssl-cert-alias: "my-service-cert"

You need to replace my-service-cert by the name of your certificate.

The easiest way to create a service accordingly, is to run kubectlwith the --dry-runoption: 

kubectl expose deployment nginx --type=LoadBalancer --port=443 --targetPort=80 --dry-run -o yaml > nginx-svc.yaml

After adding the annotations, your nginx-svc.yaml should like look the following:


apiVersion: v1
kind: Service
metadata:
annotations:
service.beta.kubernetes.io/vcloud-avi-ssl-ports: "443"
service.beta.kubernetes.io/vcloud-avi-ssl-cert-alias: "my-service-cert"
labels:
app: nginx
name: nginx
spec:
ports:
- port: 443
protocol: TCP
targetPort: 80
selector:
app: nginx
type: LoadBalancer
status:
loadBalancer: {}

Excute kubectl apply -f nginx-svc.yaml and you are done:


Change virtual IP´s for CSE K8s services

The VMware Container Service extensions offers a nice integration of Kubernetes into the NSX Advanced Loadbalancer (formerly known as AVI LoadBalancer).

With the follwoing steps, you can create a demo nginx and expose it to the VMware Cloud director external network:

$ kubectl expose deplyoment nginx --type=LoadBalancer --port=80

You might have noticed that an internal virtual IP address within the 192.168.8.x range is assigned!

Loadbalancer virtual IP address

I was quite often asked, if and how you can change the IP address range!

Yes, it is possible to change the IP address range but some Kubernetes magic is needed!

Disclaimer: You are executing the steps described below on your own responsibility!

First of all, you have to backup the original config! If you do not backup your config, there is a high risk of destroying your K8s cluster!

We have to figure out which configmap needs to be backed up. Look out for ccm.

$ kubectl get configmaps -n kube-system
NAME                                      DATA   AGE
antrea-ca                                 1      27h
antrea-config-9c7h568bgf                  3      27h
cert-manager-cainjector-leader-election   0      26h
cert-manager-controller                   0      26h
coredns                                   1      27h
extension-apiserver-authentication        6      27h
kube-proxy                                2      27h
kube-root-ca.crt                          1      27h
kubeadm-config                            2      27h
kubelet-config-1.21                       1      27h
vcloud-ccm-configmap                      1      27h
vcloud-csi-configmap                      1      27h

You need to backup the vcloud-ccm-configmap!

$ kubectl get configmap vcloud-ccm-configmap -o yaml -n kube-system > ccm-configmap-backup.yaml

As a next and more important step, you have to backup the ccm deployment config.

Use kubectl to figure out which pod needs to be backed up. Typically the pod is deployed in the namespace kube-system. Look out for a pod containing vmware-cloud-director-ccm-*.

$ kubectl get pods -n kube-system
NAME                                         READY   STATUS    RESTARTS   AGE
antrea-agent-4t9wb                           2/2     Running   0          27h
antrea-agent-5dhz9                           2/2     Running   0          27h
antrea-agent-tfrqv                           2/2     Running   0          27h
antrea-controller-5456b989f5-fz45d           1/1     Running   0          27h
coredns-76c9c76db4-dz7sl                     1/1     Running   0          27h
coredns-76c9c76db4-tlggh                     1/1     Running   0          27h
csi-vcd-controllerplugin-0                   3/3     Running   0          27h
csi-vcd-nodeplugin-7w9k5                     2/2     Running   0          27h
csi-vcd-nodeplugin-bppmr                     2/2     Running   0          27h
etcd-mstr-7byg                               1/1     Running   0          27h
kube-apiserver-mstr-7byg                     1/1     Running   0          27h
kube-controller-manager-mstr-7byg            1/1     Running   0          27h
kube-proxy-5kk9j                             1/1     Running   0          27h
kube-proxy-psxlr                             1/1     Running   0          27h
kube-proxy-sh68t                             1/1     Running   0          27h
kube-scheduler-mstr-7byg                     1/1     Running   0          27h
vmware-cloud-director-ccm-669599b5b5-z572s   1/1     Running   0          27h
$ kubectl get pod vmware-cloud-director-ccm-669599b5b5-z572s -n kube-system -o yaml > ccm-deployment-backup.yaml

Copy the ccm-configmap-backup.yaml to antoher file like ccm-configmap-new.yaml. Open the ccm-configmap-new.yaml, you created before, in a text editor like vim. Change the startIP and endIP according to your needs!

apiVersion: v1
data:
  vcloud-ccm-config.yaml: |
    vcd:
      host: "https://vcd.berner.ws"
      org: "next-gen"
      vdc: "next-gen-ovdc"
      vAppName: ClusterAPI-MGMT
      network: "next-gen-int"
      vipSubnet: ""
    loadbalancer:
      oneArm:
        startIP: "192.168.8.2"
        endIP: "192.168.8.100"
      ports:
        http: 80
        https: 443
      certAlias: urn:vcloud:entity:cse:nativeCluster:58ae31cd-17b6-4702-bf79-7777b401eb32-cert
    clusterid: urn:vcloud:entity:cse:nativeCluster:58ae31cd-17b6-4702-bf79-7777b401eb32
immutable: true
kind: ConfigMap
metadata:
  annotations:
    kubectl.kubernetes.io/last-applied-configuration: |
      {"apiVersion":"v1","data":{"vcloud-ccm-config.yaml":"vcd:\n  host: \"https://vcd.berner.ws\"\n  org: \"next-gen\"\n  vdc: \"next-gen-ovdc\"\n  vAppName: ClusterAPI-MGMT\n  network: \"next-gen-int\"\n  vipSubnet: \"\"\nloadbalancer:\n  oneArm:\n    startIP: \"192.168.8.2\"\n    endIP: \"192.168.8.100\"\n  ports:\n    http: 80\n    https: 443\n  certAlias: urn:vcloud:entity:cse:nativeCluster:58ae31cd-17b6-4702-bf79-7777b401eb32-cert\nclusterid: urn:vcloud:entity:cse:nativeCluster:58ae31cd-17b6-4702-bf79-7777b401eb32\n"},"immutable":true,"kind":"ConfigMap","metadata":{"annotations":{},"name":"vcloud-ccm-configmap","namespace":"kube-system"}}
  creationTimestamp: "2022-01-27T09:46:18Z"
  name: vcloud-ccm-configmap
  namespace: kube-system
  resourceVersion: "440"
  uid: db3e8894-5060-44e2-b20f-1eda812f84a4

PLEASE DOUBLE_CHECK that you have backed up your original config before continuing!

After applying the config, the new virtual IP address range is used:

kubectl delete -f ccm-deployment-backup.yaml
kubectl delete -f ccm-configmap-backup.yaml
kubectl apply -f ccm-configmap-new.yaml
kubectl apply -f ccm-deployment-backup.yaml


VMware Cloud director 10.2 is there

VMware Cloud Director 10.2 is there! This is a big release and a big step forward.

I played already with Cloud Director 10.2 for a while and this is a big release with lots of improvements:

  • NSX-T integration: The NSX-T integration was significantly improved so that NSX-V and NSX-T reached feature parity! One of my personal highlights are the support of VRF´s and the AVI load integration
  • Support of vSphere with Tanzu in Cloud Director: VMware Cloud Director supports as of now vSphere with Tanzu integration. It is possible to enable self-service creation of TKG clusters and management out of VMware Cloud Director 10.2

Please stay tuned, I will publish a series of blog posts on the integration of vSphere with Tanzu in VMware Cloud Director very soon!

For your reference:

Update vSphere 6.x in a VMware Cloud Director environment to vSphere 7

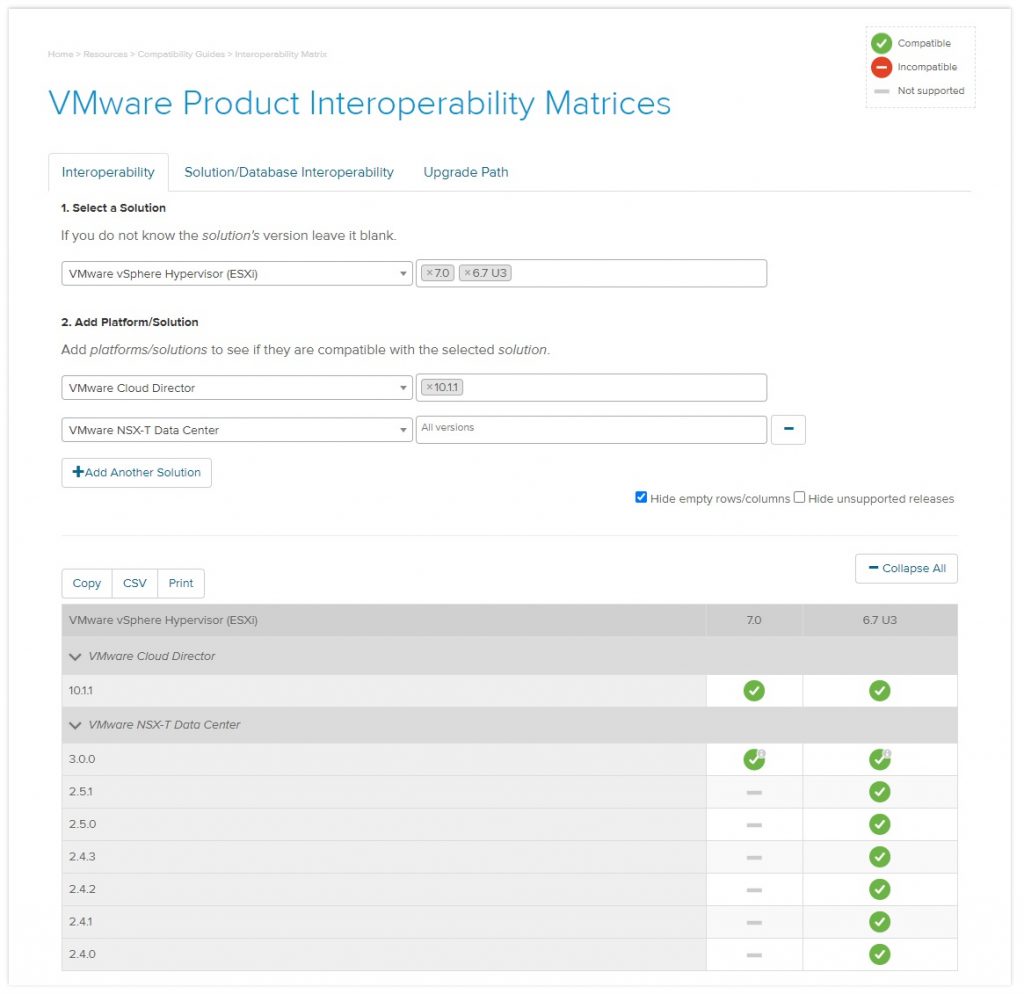
With VMware Cloud Director 10.1.1 VMware introduced support for NSX-T 3.0 and vSphere7.
Motivated by the new supported version I considered to update my lab from vSphere 6.7 U3 and NSX-V to vSphere 7.
After studying the Interoperability matrix, I noticed that vSphere 7 does not support NSX-V. As a consequence, you cannot directly upgrade from vSphere 6.7 and NSX-V to vSphere 7 and NSX-T. In the follwoing I want to high level describe how to update a VCD and vSphere 6.7 environment with NSX-V to vSphere 7.

Interoperability checks

If you would like to update an environment from vSphere 6.x and NSX-V to vSphere 7 in combination with VMware Cloud Director 10.1.1. First of all, you have to ensure that your planned version are compatible with each other. Therefore, you have to check the VMware interoperability matrix very carefully. You will notice that vSphere 7 does not support NSX-V.

See: https://www.vmware.com/resources/compatibility/sim/interop_matrix.php#interop&1=3495&661=4249&175=&hideUnsupported=false

As a consequence, you cannot upgrade directly from vSphere 6.7 U3 to vSphere 7 in a VCD environment using NSX-V. Therefore, you have to check the vSphere 6.x compatibility with NSX-T:

How to upgrade from vSphere 6.7 U3 and NSX-V to vSphere 7

As mentioned above, you cannot upgrade directly from vSphere 6.7 U3 and NSX-V to vSphere 7 in a VMware Cloud Director environment. Therefore, I recommend the following method:

  • Check the Interoperability matrix if NSX-T 3.0 is supported by your vSphere/ESXi version
  • If necessary, update vSphere/ESXi to a version supported by NSX-T 3.0
  • Install and configure NSX-T 3.0
  • Add the vCenter server that you want to migrate to vSphere 7 as Compute Manager in NSX-T (This is very important because the NSX-V to NSX-T migration tool can only migrate VM/vApps within the same vCenter server! See https://fojta.wordpress.com/2020/04/15/how-to-migrate-vcloud-director-from-nsx-v-to-nsx-t/)
  • Migrate VMs from NSX-V to NSX-T
  • Upgrade vSphere/ESXi

I highly recommend to have a look at Tom Fojita´s great blog post “How to Migrate VMware Cloud Director from NSX-V to NSX-T“!

Conclusion

You cannot upgrade in a VMware Cloud Director environment with vSphere 6.x and NSX-V directly to vSphere 7. You have to migrate from NSX-V to NSX-T first and vSphere/ESXi afterwards.

References

Usage Meter 4.2 is there

We just released Usage Meter 4.2 with some exciting new features:

Usage Meter 4.2 now supports the metering

  • VMware Cloud Foundation
  • NSX-T Data Center
  • vRealize Network Insight 
  • vCloud Availability 3.0.x and vCloud Availability 3.5.x
  • vCloud Director 9.5.x, vCloud Director 9.7.x, vCloud Director 10.0.x, and VMware Cloud Director 10.1
  • Horizon Desktop as a Service 9.0

For more details see: https://docs.vmware.com/en/vCloud-Usage-Meter/4.2/rn/VMware-vCloud-Usage-Meter-42-Release-Notes.html

CSE as a Service with encrypted configuration files

Disclaimer: All changes that you might do are your own responsibility! Please backup your configuration files before changing them. I am not liable for any damages you might create following this blog post!

I do not describe the installation of CSE in detail. For a detailed describtion how to install CSE on RedHat Enterprise Linux or similar Linux systems, see: http://www.virtualizationteam.com/cloud/vmware-container-service-extension-2-6-1-installation-step-by-step.html.

With CSE2.6 an encryption of configuration files was introduced to protect confidential information like RabbitMQ, vCenter and VMware Cloud director password.

If you want to execute the Container Service extension as a Service you need to ensure the highest level of security possible, particularly in production, so let´s start at the beginning :wink:

The CSE configuration file

You should not leave any configuration information not encrypted, otherwise your server maybe more openly accessibly .

See below an example of a config.yaml.

amqp:
  exchange: cse-ext
  host: amqp.vmware.com
  password: guest
  port: 5672
  prefix: vcd
  routing_key: cse
  ssl: false
  ssl_accept_all: false
  username: guest
  vhost: /

vcd:
  api_version: '33.0'
  host: vcd.vmware.com
  log: true
  password: MySecretPassword
  port: 443
  username: administrator
  verify: true

vcs:
- name: vc1
  password: MySecretPassword
  username: cse_user@vsphere.local
  verify: true
- name: vc2
  password: MySecretPassword
  username: cse_user@vsphere.local
  verify: true

service:
  enforce_authorization: false
  listeners: 10
  log_wire: false
  telemetry:
    enable: true

broker:
  catalog: cse
  default_template_name: my_template
  default_template_revision: 0
  ip_allocation_mode: pool
  network: mynetwork
  org: myorg
  remote_template_cookbook_url: https://raw.githubusercontent.com/vmware/container-service-extension-templates/master/template.yaml
  storage_profile: '*'
  vdc: myorgvdc

By default CSE expects an encrypted config.yaml unless you use –skip-config-decryption.

To encrypt a config file use:

cse encrypt config.yaml --output encrypted-config.yaml

During the encryption of the file you are asked to define a password. This password is needed whenever you are using the configuration file.

You have to keep in mind that CSE does not have an internal possibility to store information like connections, credentials for needed connections or even for a state.

This means that CSE is completely stateless, with all advantages and disadvantages. One of the advantages is that you can redeploy CSE on any server as long as CSE is installed and you have the configuration file. One of the disadvantages is that you need to provide the configuration file and the password during startup of the service. This means you have to find a way to provide the password during the boot time.

To start CSE you will be prompted during the startup of the service to provide the password for the encrypted configuration file:

In a real world installation of CSE you do not want to start CSE manually, whenever your server reboots or during startup of a server. Therefore you need to have a systemd unit file to automatically start CSE. If you followed my post carefully, you might have an idea what the challenge might be: You have to provide a password during the boot time of the server.
You have to provide the password during boot time of the server in an environment variable $CSE_CONFIG_PASSWORD.
There are two ways to declare this variable:

  • in the init script
  • in an environment script referenced in the startup script
  • directly defined in the systemd unit file

Excursion: Systemd unit file

To understand how to define the variable it is useful to understand the structure of a systemd unit file. For more detail see: https://www.digitalocean.com/community/tutorials/understanding-systemd-units-and-unit-files

The init script contains of several sections. I will just explain section relevant for CSE that are the absolute basis:

  • Unit
  • Service

The Unit section looks like follows:

[Unit]
Description=Container Service Extension for VMware vCloud Director
Wants=network-online.target
After=network-online.target

In the Unit section you describe the service itself as well as dependencies that need to be fulfilled to start your service successfully.
Wants means that the network service is a soft requirement meaning that the network service should be started but the init script will be executed even if the service was not started successfully.
After means that the service will be started after the network service was started.

The Service section looks like follows:

[Service]
[Environment=CSE_CONFIG_PASSWORD='mysecretpassword'] optional
ExecStart=/home/stefan/cse.sh
User=stefan
WorkingDirectory=/home/stefan
Type=simple
Restart=always
[EnvironmentFile=/path/to/file] optional

In the section service you define the startup of the service like which executable should be started, which user to use for the startup of the service and which WorkingDirectory.
In our example of CSE,you will execute a shell script to start CSE.
ExecStart defines the executable which to use and how to call the executable.
User defines the user under which the service will be started.
WorkingDirectory defines which directory to use to store temporary information like log files.
EnviromentFile defines a file, in which you can set the environment that is used when the service is started.
Environment defines variables that are available during execution of the script. In our usecase you need either Environment, EnvironmentFile or none of them.

Define the variable in the init script

You can define CSE_CONFIG_PASSWORD directly in the shell script that is called to start CSE. You have to add export CSE_CONFIG_PASSWORD=’mysecretpassword’ to the shell script like:

export CSE_CONFIG_PASSWORD='mysecretpassword'
/home/stefan/.local/bin/cse run -c /home/stefan/encrypted-config.yaml

To ensure that that only and only the service user has read/write and execute permission ont the file because you have to store the password in clear text!

The environment variable is just valid for the time of execution and cannot be read by other users than the service user and root if somebody has unauthorized root access, you have another problem.

Define CSE_CONFIG_PASSWORD in the environment script

To define the config in the init script, you need to add EnvironmentFile=/path/to/file to the cse.service systemd unit file.
A systemd unit file could look like follows:

[Unit]
Description=Container Service Extension for VMware vCloud Director
Wants=network-online.target
After=network-online.target

[Service]
ExecStart=/home/stefan/cse.sh
User=stefan
WorkingDirectory=/home/stefan
EnvironmentFile=/path/to/file
Type=simple
Restart=always

[Install]
WantedBy=default.target

Please be aware if the EnvironemntFile is not available during execution of the script, your script will fail and CSe will not start.
The environment file is quite easy:

CSE_CONFIG_PASSWORD='MySecretPassword'

You have to ensure that that only and only the service user has read/write and execute permission on the file because you have to store the password in clear text!

Definition in systemd unit file

To define the environment variable in the systemd unit file you just have to add Environment=CSE_CONFIG_PASSWORD='Mysecretpassword' to the systemd unit file that defines the CSE startup.
You can find several examples of the unit file above.

You have to ensure that that only and only the service user has read/write and execute permission on the file because you have to store the password in clear text!

Sources

During the creation of this Blog entry I used several sources, that might be interested for further reading:

Systemd unifiles: https://www.digitalocean.com/community/tutorials/understanding-systemd-units-and-unit-files
systemd environments: https://coreos.com/os/docs/latest/using-environment-variables-in-systemd-units.html
CSE documentation: https://vmware.github.io/container-service-extension/INSTALLATION.html

And many discussion with colleagues like Eiad Al-Aqqad (see http://www.virtualizationteam.com/about)

Let´s get started

We are working on a daily basis on so many topics that would be interesting for a broader audience. Therefore, I thought that it would be a great idea to start a blog.

So stay tuned, there will be a lot of interesting material posted in the next days.